1. Piirrä kaava haluamasi kokoisten puikkojen mukaan. Muista jättää saumavarat ja tuplata kaavan koko.


2. Leikkaa kaavan mukaan kaksi kangaspalaa ja sopivan pituinen kuminauhan pala. Kuminauha on hyvä olla tarvittavien puikkojen levyinen. Jos kuminauha on kovin löysä, leikkaa se aavistuksen lyhyemmäksi kuin puikot.

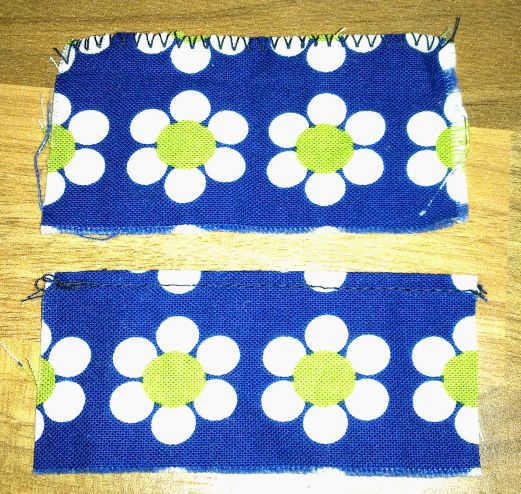
3. Ompele toiseen pitkään reunaan siksak (ylempi kuva). Taita siksak reuna taakse ja ompele yksitaitteinen päärme (alempi kuva).
4. Aseta kangaspala kaksinkerroin ja aseta se kuminauhan päälle. Huomioi, että oikeanpuoleiseen avoimeen sivuun tulee sauma, joten jätä se sauman verran enemmän oikealle.

5. Ompele yläreunaa ja oikeaan reunaan suora ommel ja siksak.

6. Tee sama peilikuvana alareunaan. Tämän jälkeen työn pitäisi näyttää tältä.

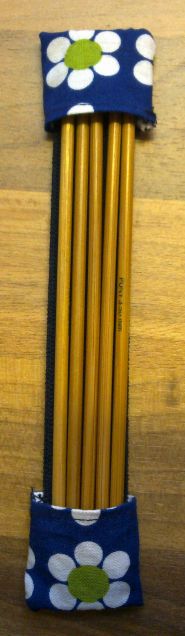
7. Käännä kankaanpalat ympäri ja työ on valmis. Valmiin työn voit tuunata haluamallasi tavalla. Mitä paksumpaa kangasta käytät, sen ryhdikkäämpi puikkopidikkeestä tulee. Mukavia ompeluhetkiä :)

And same in English. A needle holder is very convenient if you take your knitting with you while travelling. Here is how you can sew your own. See the pictures above.
1. Draw a pattern depending what size needles you want to to use. Double the pattern and remember you need a seam allowance of approximately 4 millimeters.
2. Cut two pieces of fabric and cut a piece of elastic that is the same length as your needles. The elastic should be the same width as your needles are when grouped together. If your elastic is loose, cut it a bit shorter than needles are.
3. Sew a zig-zag stitch along the upper edge of the fabric (upper image in third photo). Fold the seam back and sew the edge (lower image in third photo).
4. Fold the fabric in half (wrong side facing outwards) and place it on the top of the elastic. Notice the right side of the fabric is a big longer than the left!! You have to leave there a space for a seam and once you sew the seam then it will even out.
5. Sew the top of the fabric and to the right side a straight stich and a zig-zag stitch.
6. Do the same thing to the other piece of fabric, then your work should look like this (6th photo).
7. Turn the fabric right-side out. Then your work is finished. You may decorate you project as you wish. The thicker fabric you use, the straighter needle holder you get. Have fun sewing this! :)
Vautsi, kiitos tästä! Hyvä lahjaidea :-) Ja tuo on kyllä ollut käytössä tosi kätevä! Nytkin on kutimet hyvässä kuosissa pidikkeessään.
VastaaPoista